# Outbreak
It was a typical night at J's bar. Some uninvited guests crashed the party. Our race for survival was just beginning...
Objectives:
- Escape from J's bar.
- Push two cars to form a barricade against enemies. Then help Raymond open a gate.
- Jump into Raccoon City's sewers to escape from an explosion.
- Find some detonator parts, and combine them to destroy Main Street and stop the zombie hordes.
- Should Main Street be already destroyed, you will need to get inside Dorian's van.
# Lockpick solutions (Alyssa)
| Location | Easy | Normal | Hard | Very Hard |
|---|---|---|---|---|
| J's Bar → Stairs to break room1 | I | I | P | S |
| Break room → stairs to liquor room2 | P | P | P | S |
| Cabinet in Drawing Room | S | S | W | W |
| Storage room on rooftop3 | I | I | S | P |
Notes
- This door can also be opened with the Staff Room Key
- This door can also be opened with the Key with a Blue Tag
- This door can also be opened with the Storage Room Key.
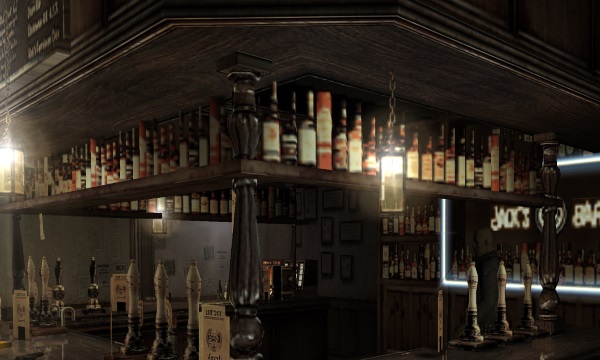
# J's bar and staff areas
The following sections are kind of hectic: there is no safe spot until halfway through the scenario, save for a locker non-Mark characters may hide in. Note that every character starts in a different spot at J's Bar; Yoko begins the scenario inside the bar's women restroom.
Search the bar and restrooms for any useful items, then approach the locked door right of the kitchen. If you happened to come across a key with a red tag, unlock this door now. If not, Alyssa can use her lockpicks, and Mark can empty his handgun to force open the door. Other characters may also have come across a fully loaded handgun; don’t hesitate to use it for forcing the door open. Now go through the door, and up the stairs to the staff room. Be careful while picking up the green herb by the window: a zombie may break through.
Ignore Will’s room (you don't have time nor weaponry,) and continue past some wooden planks. If you want to temporarily halt the zombies, look for a nail gun, located by following the left wall, and use it on the planks to build a barricade. You can also explore the locker room for a key, and the drawing room for ammo. During your explorations, if you happen to find a lighter, keep it so you can make Molotov cocktails later. Your next task is to unlock the door leading to the stairs to 3F; Alyssa can easily pick the lock. If you still have some handgun ammo left, you can force open the door on the right wall. You could also tackle this door, but the zombies will make it a hassle. Otherwise, you will have to look for a key, which may spawn inside the room on the far right, or under the newspaper in the table next to the sofa. Use it to unlock the door, then go on.
# Liquor room and rooftops
Enter the liquor room. You can go inside the wine cellar for an alcohol bottle and a FAS. By this time, the zombies will probably have invaded the staff room, and are probably making their way to the liquor room. There are two ways to proceed to the next area: either break open the shutter, or get the forklift key to raise a crate and crawl through a safe path.
In case you decide to break open it, note that the shutter is the second most durable doorway in both games combined. There is an exploit to let the zombies force open the shutter instead; check this clip (opens new window) for details. Otherwise, use any weapons or shoulder tackle the shutter; don't bother with Molotov cocktails, though, since they do little damage to doorways. In any case, go past the shutter, and upstairs; skip the next paragraph.
If you decided against opening the shutter, make sure you’re carrying an alcohol bottle (i.e.: not combined with newspaper,) then carefully make your way to the staff room. Enter the room farthest from the stairs, and take a sharp turn to your character’s right. Use the bottle on the frame, and pick up the forklift key from the now unlocked drawer. Return to the liquor room, and use the key on the forklift to raise some crates. Be sure to interact with the forklift again after using the key. Now you can go up the ladder, and crawl your way to the next room. Go up the stairs.
If you don’t have any firepower left, you may want to pick up the iron pipe. Exit to the roof, and continue through the path while avoiding the crows. There are some herbs laying around if you want some healing, but mind the flying foes. Force open the metal rail on the end of the passway, using manual aim so as to make sure not to target the birds. There is a door in front of the rail leading to the storage room; if you happen to have the storage key, you can enter this room for a FAS and a handgun clip; Alyssa can also pick the lock. Now go up the ledge past the fallen rail, and advance to trigger a cutscene.
# Countdown
You now have three minutes to reach the street level. This timer is very lenient, so don't panic. Continue through the passway until you find a gap between the buildings. It is vitally important that you don’t miss this next jump: if you fail, you may be attacked by crows while hanging, and fall to your death. To jump successfully, press the action button just when your character’s right foot touches the ground. If you miss the jump, smash the buttons to climb as soon as possible. After landing on the building, turn left and enter the door.
Approach the elevator, and wait for a zombie to spawn. Kill or avoid her, and call for the elevator she just came through. There’s a red herb here; claim it while waiting for the lift. Use the elevator to go down, and pick up more herbs. At the intersection, turn left and open the door at the end while avoiding any zombies you may come across. Once outside, wait for all your partners to get out of the building; any character left behind will die when the next cutscene activates, or when the timer reaches zero.
# Raymond and the scissortails
You finally get a moment of rest - emphasis on moment. The next couple of sections are also full of action. When everyone's ready, go down the steps to activate a cutscene. Your task is to form a barricade by pushing two cars. On Very Hard, scissortails will get in your way. These pesky bugs can jump to your location, putting your character in Poison or Bleed - or both. Keep pushing the cars (you are invincible while pushing objects,) and you will trigger another cutscene.
Raymond will now start shooting the double doors. You can help him by shooting/tackling the doors, but you’ll be at the mercy of scissortails. It’s better to let Raymond do his job, while you move in eights or circles around the room, picking up anything you deem useful. After a couple of minutes, another cutscene will kick in.
Pick up the shotgun from Raymond’s corpse, and the lighter if you don’t have one already. Run to the oil tank while avoiding the scissortails, and turn the valve to activate another cutscene. Now get away from the spilled oil, and use the lighter for a second cutscene. Finally, jump into the water canal on the left, and advance into a doorway to activate a third cutscene. Climb up the ledge to appear inside a sewer passageway.
# Dorian and the zombie hordes
Now the scenario is a lot more calm. Continue through the sewer, and go up the ladder at the far end. Explore the area for some goodies, then speak to Dorian (the walking cop) to activate yet another cutscene.
In this new area, pick up more herbs and ammo, then go around the police truck until you find a set of stairs. You will find the Magnum revolver in the windowsill at the second set of steps. Now continue, and cross the footbridge for, yes, another cutscene. You must now make a decision: either confront the zombie horde, or return to Dorian’s van. All players must agree on returning, though. If you do, speak to Dorian to end the scenario.
If you want to confront the hordes, follow the footbridge and go down some steps. If you speak to Harry (the limping cop,) he will give you a handgun. Now, you must pick up a detonator handle, and a detonator main unit. These are very close to the zombie hordes. By the way, zombies in this area will almost always turbo, so make quick work of them (or dodge them,) combine the parts to make a complete detonator, and use it while close to Eric's body to end the scenario. If for some reason you were left behind when the cutscene kicks in, you must return to Dorian and board the truck instead, since Main Street will then be destroyed.