# Flashback
An abandoned building in a foggy forest. All around us were the echoes of some forgotten tragedy. Enveloped in evil, we pressed onward.
Objectives:
- Find a way to the abandoned hospital through the forest.
- Find some syringes, fill them with solvent, and use them on Dorothy's three exposed pods, while avoiding the Axeman.
- Defeat the now vulnerable Dorothy, and escape the hospital before it collapses.
- If you did not make it to the hospital in time, navigate through the forest to find a large bridge.
# Lockpick solutions (Alyssa)
| Location | Easy | Normal | Hard | Very Hard |
|---|---|---|---|---|
| Locker in 1F Locker Room | I | I | P | S |
| 2F room with pod → 2F Hallway | - | - | P | S |
# The path through the forest
Approach the door to activate a cutscene with Al. Exit the cabin and go straight and to the right, relative to your character, to find a blue herb. Look for more herbs on the other side of the cabin, then exit the area through the path beneath the huge tree.
This area is a maze of sorts. If you look at your map, there will be a huge UNKNOWN over it. For clarity, directions for going through the forest will be given relative to your character. Follow the path and take a turn left, avoiding a green zombie in the process. This zombie variety will expel a poisonous dust if tackled, so just go past him. At the intersection, go left, then in the 4-way intersection, go straight; in the next 4-way intersection, go left (alternatively, go right at the first 4-way intersection, left, then straight at the second 4-way intersection.) If Alyssa is not not your team, you will find her laying down. Continue through the path until you find a T-intersection; take a turn right and follow the path through the exit. Along the way to the exit, pick up any herbs you might find, and don't hesitate to mix them if necessary.
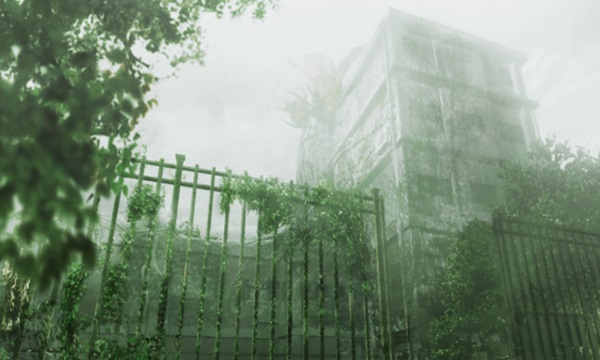
Continue across the bridge to the next area, picking up any goodies you might need. Soon, you will find the entrance to an abandoned building; explore the area for more herbs, some melee weapons and a document. There is a door on the end of the pathway; if you use adlibs, your character will comment there is no way back. Enter the building...once you do, you won't be able to leave the building until the end of the scenario.
# The first two pods
Follow the hallway and turn left: you will activate a cutscene where Axeman appears. Quickly go past him, the open the door at the end. Take a sharp turn right to avoid the green zombie attack, then carefully proceed to break the box with a shoulder tackle. If you see a needle, pick it up; otherwise check the drawers next to the door and get the solvent-filled syringe. Return to the hallway, and continue until you find a set of stairs.
If David is on the team, he should already have a lighter, saving you a bit of backtracking; continue past the stairs through another door, and skip the next paragraph.
If you don't yet have a lighter, go up to the second floor, avoiding the Axeman's attacks. Follow the wall on your left, ignoring the first two doors you will come across, until you find a wooden crate. Tackle it and obtain the goodies underneath. Then enter the door closest to the vines blocking the rest of the hallway. You will find a red protrusion inside one of the walls; use your solvent-filled syringe on it to activate a cutscene. Now return to the hallway, and you will see the vines are no longer blocking the way. Continue to the end of the hallway, avoiding a stray vine, if it's there. At the end of the hallway, you will find two doors; unlock the right door, and exchange your empty syringe for a full one laying around this area, if there is one. Now enter the left door, then immediately exit to avoid the two green zombies. Wait for them to break the door open, then enter this room again. Go to the bed in front of you to obtain a lighter. If you don't yet have a solvent-filled syringe, you will find one on the bed next to the entrance. Return to the first floor, and follow the right wall to find a door and go through it.
In this hallway, you will find a door leading to a locker room. Enter if you want for some herbs, then return. Follow the hallway and go down a set of stairs. At the end of this hallway, you will find a red protrusion: use the syringe to activate a cutscene. After the cutscene ends, continue through the hallway, doing your best to avoid the stray vine (if there is one,) and enter the pharmacy. On the opposite corner of where you stand, there is a solvent-filled tank; use your empty syringe to fill it again. Now take a U-turn to find a key; pick it up and exit the pharmacy. Enter the other door, and carefully make your way past the vines to the bulb's right side (your character's left.) If you interact with it, you will see the corner is too dark; use the lighter and pick up another key. Make sure to keep the lighter in your inventory, then return to the first hallway on 1F.
# The third pod
Go upstairs to 2F. If you haven't used the syringe on this floor yet, proceed to do it now. Make sure you have a solvent-filled syringe, and enter the door closest to the stairway. Use the key you found in the pharmacy, then follow the right wall to find a mechanism with a button. Use the other key you found on this mechanism to reveal a secret hallway. Follow it and go upstairs to a bee-infested room. If there is an axe, pick it up, forgoing the lighter, then go through the door to the hospital's exterior. Carefully move past the nightshades, collecting the healing item close, and pick up another key, laying close to the hole. If the axe is here, pick it up, getting rid of the lighter. If you jump down, you will end up at Room 203 (where you found the lighter.) Return to 1F, and follow the hallways until you find a door next to the stairs leading to B1F. Use the key and enter.
Take a sharp turn right to avoid the green zombie attack, then follow the hallway while staying close to the left wall. You will avoid the stray vine this way. Go up the stairs, then up the vines to find yourself once again on the hospital's exterior. Continue to find two nightshades and a giant vine. If you are still carrying the lighter, use it on the vine to get the axe. Use the axe to kill the two nightshades and make sure you have your full syringe ready for this next bit of business.
Go up the ladder the nightshades were protecting, and you will see Axeman reaching up to you. Use the axe to defeat him, then follow the open pathway, past two nightshades, to another set of climbable vines. Go up, do your best to avoid the bees and approach the protrusion on the plant. Use the syringe to activate another cutscene. Go back, down the ladder, and jump through the hole that was created after the cutscene. Follow the hallway to another hole on the floor, and jump down. Pick up any goodies, then exit the room through the door closest to the drawers; if you try to open the other door, a cutscene will play and the door will be locked. Follow the hallway and unlock the door at the end. This is the hallway with the green zombie and the stray vine. Exit the hallway and proceed to B1F. Enter the room with the big plant pod for a boss battle.
# Boss battle: Dorothy
As long as you stay close to the wall, Dorothy cannot hurt you. If you stay in the middle, she will wrap you in the vines, and may take your character from Caution to Down, so be careful. Also, whenever you attack Dorothy, debris will randomly fall, inflicting some damage. You should also mind the three stray vines.
The quickest way to beat Dorothy is by staying close to where you found the rusty key, and attacking with the axe. If your character has a dodge, you can use a knife and use the dodge immediately after attacking Dorothy in order to avoid the falling debris. This will also work if you shoot Dorothy with your pistol close from the entrance. While Dorothy is weak to green chemical bottles, it's not really worth the item slot; healing items are much more useful. Keep attacking Dorothy until a cutscene plays.
After the cutscene, the words CAUTION will start blinking on the screen. You now have a few minutes to escape the hospital. Go up the stairs to find Axeman; you can either deal with him (use your axe,) or avoid him completely. In any case, follow the hallway, and turn right, entering the closest door. Use any remaining healing items to counteract the damage done by the falling debris. Open the now unlocked door in this room to end the scenario.
# What if I was left behind?
If the breaking bridge cutscene plays before you make it to the suspension bridge, you will have to finish the scenario using this alternative route. Zombies in the forest will disappear, and scissortails will take their place. Scissortails in File #2 are extremely dangerous, attacking almost immediately after seeing you. They can put your character in Poison, Bleed...or both! The following paragraphs assume you are inside the cabin when the cutscene starts.
# OPTIONAL - Regan and her daughter
Inside the cabin, you will find Regan, a survivor whose daughter is lost somewhere inside the forest. She will give you a pendant if you talk to her. From the cabin entrance to the forest, stick to the right side of the path, and you will find Lucy, Regan's daughter, at the river bank. Give her the pendant, and Lucy will make her way to the cabin. Yes, by herself. If you talk to Regan after "rescuing" Lucy, she will reward you with a weapon, which can be useful for this next bit of business.
To finish the level, follow the same path as in the main route, except at the final T-junction, turn left instead of right. Follow the pathway to find the big suspension bridge. This area is infested with bees and green zombies. If you have some firepower left, shoot the bees to stun them. There's no use in defeating these enemies, though, since they're invincible - just follow the road to the end.